Getting Started with Local AI: A Coding Stack That Runs on Your Own Hardware
For the past couple of weeks I have done real coding on a model running entirely on my own GPUs. Here is the hardware, the model, and what every parameter actually does.
TL;DR
For the past couple of weeks I have done my coding on a 27-billion-parameter model running entirely on a graphics card in my own office, with no per-token charges. The stack is llama.cpp serving a quantized Qwen3.6-27B model, driven by two agents: pi for coding and Hermes for everyday tasks. This walks through the setup and what every part does.
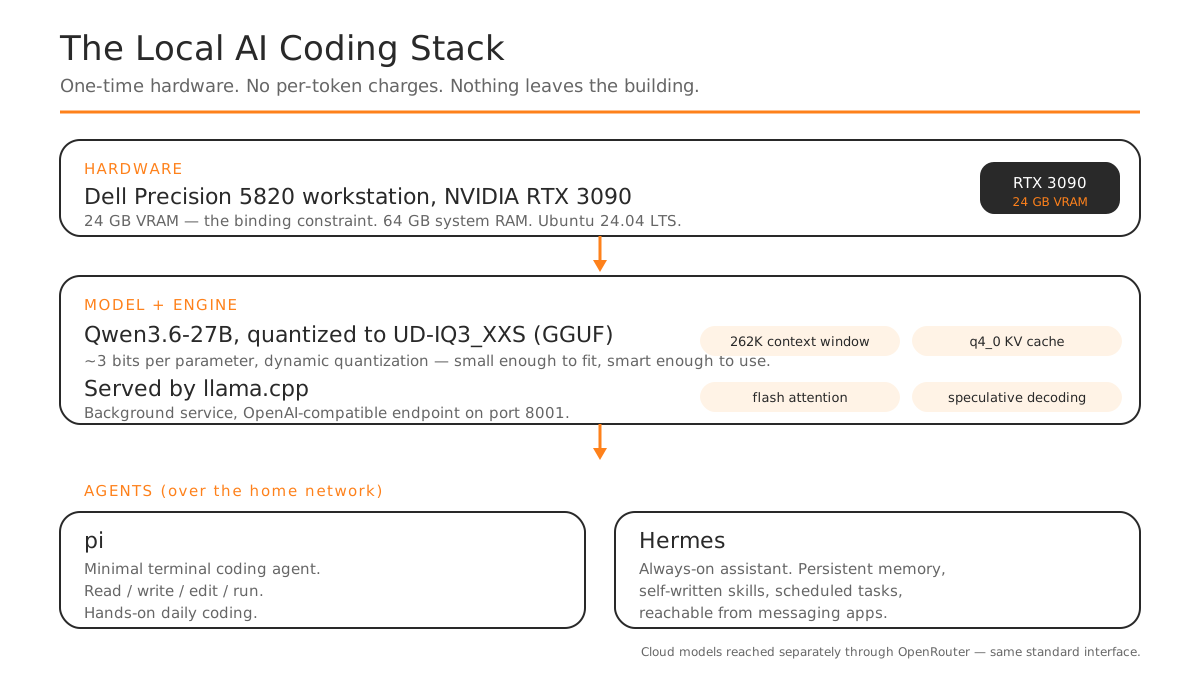
There is a graphics card sitting in a workstation under my desk in Kirkland. It is an NVIDIA RTX 3090, a couple of generations old now, the kind of thing you can find used for a few hundred dollars. For the past couple of weeks, every line of code I have written has gone through a large language model running on that card. No API key. No metered billing. No data leaving the building. When I close a coding session, the only thing it cost me was electricity.
I have written before about doing my taxes with Claude Code and Codex and about canceling SaaS subscriptions once AI agents made the switching costs collapse. Both still rely on frontier models in the cloud, and for a lot of work I still reach for those. They are excellent and I am not giving them up. But a question kept nagging at me: how much of my daily coding actually needs a frontier model, and how much could run on hardware I already own?
For most of the past two years, the honest answer was “not much.” Local models were interesting but not good enough to lean on. That has changed, and it changed fast. Two things are true at once here. In the field, the last couple of months have brought remarkable progress in how much capability fits on a consumer card. And personally, I have only been working this local AI project for about two weeks. The local models are still not the equivalent of the best cloud models — I want to be clear about that — but the gap has closed enough that for a real share of my work, the local option now wins.
This is the first of a few pieces on local AI. In a later one I will describe the agentic software development, writing, and marketing teams I am building on top of this foundation. For now I want to start where everything else has to start, with the engine: the hardware, the model, the server that runs it, and the exact settings I use to invoke it. I will explain the settings in enough detail that you can understand why they are there, not just copy them.
What “Local AI” Actually Means
When people say “AI,” they usually mean a service: you send text to a company’s servers, their model generates a response, and you pay per token. The model itself lives on hardware you will never see.
Local AI inverts that. The model weights — the multi-gigabyte file that contains everything the model learned during training — sit on a disk in your building. A program loads those weights into your GPU’s memory and runs the math required to generate text. The conversation never leaves your network. There is no per-token charge because there is no third party metering the tokens. You bought the hardware once, and now the marginal cost of a request is the power it draws while it runs.
That tradeoff is the whole story. Cloud models are larger and generally smarter, and you pay for every use. Local models are smaller and run on your own hardware, and once the hardware is paid for, use is effectively free. The interesting question is not which approach wins. It is which approach fits which job. For the past couple of weeks of my coding, the local model fit.
The Cloud Side: OpenRouter
Before the local hardware, a word about the other half of how I work, because the two fit together.
For cloud models, I use OpenRouter. It is a single service that sits in front of dozens of model providers — Anthropic, OpenAI, Google, and many others — and gives you one account, one API key, and one bill to reach all of them. Instead of holding separate accounts with each provider, you send a request to OpenRouter and name the model you want, and it routes the request to whoever serves that model. The practical benefit is that switching from one provider’s model to another’s is a one-line change, not a new contract. When a better model comes out, I try it the same afternoon.
That matters here because the same standard interface that lets OpenRouter route to many cloud providers is the interface my local server speaks. The tools I use do not care whether the model answering them lives in a data center reached through OpenRouter or on the card under my desk. That interchangeability is what makes a mixed local-and-cloud setup practical rather than a science project.
The Hardware: Used Workstations with One Card Each
I own several GPUs across a few machines. The work in this article runs on a pair of older Dell Precision 5820 workstations. Each one has a 950-watt power supply, 64 GB of system RAM, and a single NVIDIA RTX 3090. Both run Ubuntu 24.04 LTS, the current long-term-support release of Ubuntu, which is a stable and well-supported base for this kind of always-on service.
The two machines are entirely separate systems. They are not networked together to run one model across both cards, and they do not need to be. Each one runs the whole model on its single 3090, on its own. I keep two because two gives me production capacity — I can run jobs on both at once, or take one down without losing the other. For the purposes of this article, picture one workstation with one card; the second is simply a duplicate of the first.
The cards are not new and they were not expensive. What makes them useful is memory: each RTX 3090 has 24 GB of VRAM, and VRAM is the binding constraint for running a model locally.
Here is why memory dominates. To generate text quickly, the model’s weights need to live in the GPU’s memory, where the GPU can read them at enormous bandwidth. If the weights do not fit in VRAM, you either spill them into ordinary system RAM, which is far slower, or you cannot run the model at that size at all. So the practical question for any local setup is not “how fast is the card” but “how much will fit.” A single 3090’s 24 GB is enough to hold the quantized 27-billion-parameter model I use plus the working memory it needs during a long session, with room to spare.
If you are pricing this out: the binding constraint is VRAM per dollar, and the previous generation of high-memory consumer cards remains the value sweet spot. You do not need the newest hardware. You need enough memory.
The Model: Qwen3.6-27B
The model I am running is Qwen3.6-27B, an open-weight model from Alibaba’s Qwen team. “Open-weight” means the trained weights are published for anyone to download and run, which is what makes local use possible in the first place. “27B” means roughly 27 billion parameters — the tunable numbers the model adjusted during training. As a rough mental model, more parameters generally means more capability and more memory required to run it.
I picked this model deliberately. The current generation of mid-sized open models has gotten good enough that a 27B model now does work that used to require something several times larger. That is the development that makes a setup like this worth your time in 2026 when it would not have been a couple of years ago. NVIDIA made the same observation recently when describing local agents: the Qwen 3.6 27B and 35B models are outperforming the previous generation’s much larger counterparts while still fitting on consumer cards. The model got smaller and smarter at the same time, which is exactly the trend that brings this within reach of a small business.
Where the Model Comes From: Hugging Face
You download open-weight models from Hugging Face, which is the center of gravity for the open machine-learning world. Think of it as the GitHub of models: it hosts hundreds of thousands of models and datasets, each on its own page (called a “repository,” or “repo”) with documentation, files, and version history. When you want a local model, you find its repo on Hugging Face and download the specific file you need.
The specific repository I download from is unsloth/Qwen3.6-27B-MTP-GGUF. Reading that name left to right tells you a lot: unsloth is the account that published it, Qwen3.6-27B is the model, MTP flags a particular capability I will return to below, and GGUF is the file format. My install script pulls a single file from that repo, Qwen3.6-27B-UD-IQ3_XXS.gguf, into a local models directory.
Downloading is done with Hugging Face’s command-line tool, which my script installs into its own isolated Python environment. Some repositories are public and download with no account; others ask you to be logged in or to accept the model’s license first. For those, you create a free Hugging Face account, generate an access token in your account settings, and hand that token to the download tool. My script reads the token from an environment variable so it never has to appear in a command you type. If you set no token, it still tries an anonymous download, which works for public models but with lower rate limits.
Quantization: Making the Model Fit
A 27B model at full precision would not fit in 24 GB of VRAM with room left over for a long coding session. The technique that solves this is called quantization.
In its original form, each of the model’s parameters is stored as a relatively high-precision number. Quantization compresses those numbers into a smaller format — fewer bits each — which shrinks the total file dramatically. You can think of it like saving a photograph at a lower bit depth: the file is smaller and slightly less precise, but for most purposes you cannot tell the difference. There is a real tradeoff. Compress too aggressively and the model gets noticeably less reliable. The art is finding the point where the model still fits comfortably in memory but has lost as little capability as possible.
The variant I download is the one configured in my install script: Qwen3.6-27B-UD-IQ3_XXS.gguf. Every piece of that label means something, and once you can read it you can read any quantized model’s name:
- IQ3 means roughly three bits per parameter, using one of llama.cpp’s “I-quant” formats. (For comparison, common quantizations run from about two bits at the small, aggressive end up to eight bits near full fidelity.) Three bits is fairly aggressive compression, which is what lets a 27B model leave headroom for a large working context on a single 24 GB card.
- XXS marks it as the extra-extra-small size class within that format — the most compressed option in that family.
- UD stands for Unsloth’s “Dynamic” quantization. Rather than compressing every part of the model equally, this approach keeps the parts of the model that matter most at higher precision and compresses the less-sensitive parts more aggressively. The result holds up better than a uniform three-bit quantization would, which is the whole point: it buys back much of the quality that naive three-bit compression would throw away.
- GGUF is the file format itself — the standard container for models that run under llama.cpp. When you go looking for a local model, GGUF is the format you want.
The MTP in the repository name refers to multi-token prediction, a capability baked into this particular build of the model. It is what makes the speed trick described later in this article possible.
The Engine: llama.cpp
The program that actually loads the model and runs it is llama.cpp, an open-source project that has become the workhorse of the local AI world. It is fast, it runs on ordinary hardware, and it includes a small web server, llama-server, that exposes the model over an interface compatible with the OpenAI API. That last detail matters more than it sounds: because the server speaks a standard protocol, almost any tool built to talk to a cloud model — the same kind of tool you would point at OpenRouter — can be pointed at my local server instead, with no other changes.
You will find llama.cpp on GitHub at github.com/ggml-org/llama.cpp. It is one of the most active open-source projects of its kind, with releases landing constantly. You build it from source for your specific hardware. On an NVIDIA machine that means compiling it with CUDA support — CUDA being NVIDIA’s toolkit for running general-purpose computation on the GPU — so that llama.cpp can use the card rather than the CPU. My install script clones the repository, configures the build for the RTX 3090’s specific GPU architecture, compiles it, and produces the llama-server binary.
One detail worth noting for anyone trying to reproduce this exactly: I build from a specific development branch (mtp-clean) rather than the default, because that branch carries the multi-token-prediction support that pairs with the model’s MTP capability. If you are using a stock model without that feature, the mainline build is what you want.
I also install the server as a background service using systemd, the standard service manager on Ubuntu. That means the model server starts automatically when the machine boots and restarts itself if it ever crashes, so it is simply always there, the way a printer or a file share is always there. The service binds to my home network so I can reach it from my laptop or my phone, not only from the machine with the GPU in it.
The Invocation: What Every Parameter Does
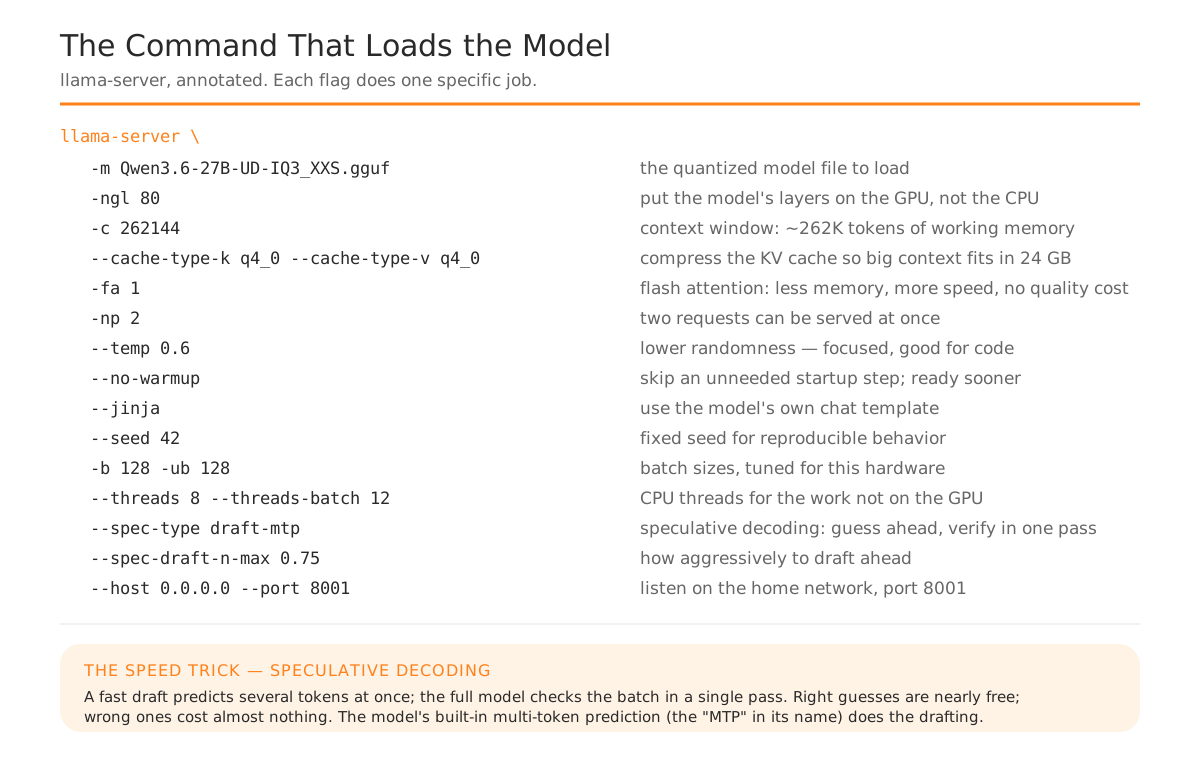
Here is the heart of it. This is the command the service runs to start the model.
llama-server \
  -m Qwen3.6-27B-UD-IQ3_XXS.gguf \
  -ngl 80 \
  -c 262144 \
  --cache-type-k q4_0 --cache-type-v q4_0 \
  -fa 1 -np 2 \
  --temp 0.6 \
  --no-warmup \
  --jinja \
  --seed 42 \
  -b 128 -ub 128 \
  --threads 8 --threads-batch 12 \
  --spec-type draft-mtp --spec-draft-n-max 0.75 \
  --host 0.0.0.0 --port 8001
It looks dense, but each piece is doing one specific job. Let me walk through it in groups.
Loading the model onto the GPU.
-mpoints at the model file. Nothing surprising there.-ngl 80tells the server to put 80 of the model’s layers onto the GPU. A model is built as a stack of layers, and each layer can run either on the GPU (fast) or the CPU (slow). The goal is to put as many layers on the GPU as the VRAM allows. With 24 GB on the card, this setting puts effectively the whole model on the GPU, which is what keeps it fast.
Context size and the cost of memory.
-c 262144sets the context window to 262,144 tokens — the amount of text the model can hold in working memory at once, counting both the conversation so far and the files it is reading. For coding, large context matters a lot. An agent accumulates file contents, command output, and conversation history quickly, and running out of room mid-task is genuinely disruptive. A quarter-million tokens is a lot of headroom.--cache-type-k q4_0 --cache-type-v q4_0is the setting that makes that large context affordable. As the model works, it builds up an internal scratchpad called the KV cache, and that cache grows with the context size. At a large context it can consume more memory than the model weights themselves. These two flags compress the cache to a four-bit format, which is the single most important trick for fitting a big context on consumer hardware. Without it, a context this large simply would not fit on a 24 GB card.
Throughput and quality settings.
-fa 1turns on flash attention, a more memory-efficient way of doing the model’s core attention computation. It saves memory and time at no real cost in quality.-np 2allows two requests to be handled at the same time. I sometimes have a coding agent and a second task both talking to the server, and this lets them share it without one blocking the other. Raise this higher and memory use climbs quickly, so two is a deliberate, conservative choice.--temp 0.6sets the temperature, which controls how much randomness the model uses when choosing each next word. Lower values make it more focused and deterministic; higher values make it more varied and creative. For coding, you want focus, so a value below the default is appropriate.--seed 42fixes the random seed so that, given the same input, the model behaves reproducibly. That is useful when you are trying to understand why something happened.
Operational details.
--no-warmupskips a startup step that is not needed here and gets the server ready faster.--jinjatells the server to use the model’s own chat template — the specific formatting Qwen expects for the back-and-forth between user and assistant. Getting this right matters; the wrong template quietly degrades the model’s responses.-b 128 -ub 128set the batch sizes — how many tokens the server processes in one pass. These are tuned to balance speed against memory on this particular hardware.--threads 8 --threads-batch 12control how many CPU threads do the work that is not on the GPU.
The clever part: speculative decoding.
--spec-type draft-mtp --spec-draft-n-max 0.75enables speculative decoding, and this one deserves a real explanation because it is doing something genuinely interesting.
Normally a model generates text one token at a time, and each token requires a full pass through the model. That is the slow step. Speculative decoding speeds it up by having a small, fast “draft” predict several upcoming tokens at once, then having the full model check that batch of guesses in a single pass. When the guesses are right — and for routine code they often are — you get several tokens for the price of one pass. When they are wrong, you fall back to normal generation and lose nothing but a little wasted effort. The draft-mtp part uses the multi-token-prediction capability built into this particular model (the MTP in its name) to do the drafting, rather than running a separate small model alongside it. The net effect is meaningfully faster generation, which is what makes a local model pleasant rather than merely possible to use.
Where it listens.
--host 0.0.0.0 --port 8001makes the server reachable on port 8001 across my home network rather than only on the machine itself. If you set this up yourself and you do not want it reachable from other devices, bind it to127.0.0.1instead, which restricts it to the local machine. A model endpoint left open where others can reach it is worth thinking carefully about; mine is inside my own network behind my own firewall, and that is a deliberate decision, not an accident.
I also cap the GPU’s power draw with a separate service. The card will happily pull more power for a small speed gain, and limiting it keeps the office cooler and quieter for a difference in speed I cannot feel during normal work. That is a personal preference, not a requirement.
The Two Agents
A model server by itself just answers requests. To do real work you put an agent in front of it — a program that can read your files, run commands, and iterate on a task. Because llama.cpp speaks the standard OpenAI-compatible protocol, both of the agents I use connect to my local server by pointing them at http://localhost:8001 instead of a cloud provider. They are the same kind of tool you would otherwise point at OpenRouter.
The first is pi, an open-source coding agent that runs in the terminal. It is deliberately minimal — the model gets a small set of tools (read a file, write a file, edit a file, run a shell command) and the rest is built up through skills and extensions. It is provider-agnostic by design, which is exactly why pointing it at a local model is a one-line change rather than a project. This is what I have been using for the actual coding these past couple of weeks.
The second is Hermes, an agent from Nous Research aimed at always-on, everyday use rather than coding specifically. It keeps memory across sessions, writes and refines its own skills as it goes, can run scheduled tasks on its own, and reaches me through ordinary messaging apps. Where pi is my hands-on coding tool, Hermes is the always-running assistant. Notably, Nous built Hermes with exactly this class of model in mind — Qwen3.6-27B is one of the models it is designed to run well on, which is part of why the whole stack fits together as cleanly as it does.
I am not going to claim the local model matches a frontier cloud model on the hardest problems. It does not, and I would not expect a 27B model to. What I will say is that for a large share of day-to-day coding — the reading, the small edits, the routine refactors, the “what does this function do” questions — it has been entirely sufficient, and it has been free.
Where This Fits
The honest framing is not local versus cloud. I use both, and I expect to keep using both. I reach the frontier models through OpenRouter when a problem is hard or novel. I reach the local model on the card under my desk for the steady stream of ordinary work that would otherwise run up a metered bill and send my code to someone else’s servers.
What changed for me recently is that the local option crossed from “interesting experiment” to “default for a real category of work.” The model got good enough, the quantization got smart enough, and the tooling got standard enough that the friction mostly disappeared. A used graphics card and a few open-source projects now do work that would have been impractical to run locally not long ago.
If you are a small business owner or an individual wondering whether this is worth it, the calculus is the same one I keep coming back to in this work: the cost is the one-time hardware purchase and a weekend of setup; the benefit is capability you own outright, running on your terms, at no marginal cost. For the right kind of work, that math is hard to argue with.
I have been running this setup every day, and I am still learning where its edges are. If you are thinking about local AI for your own affairs or for your business and want to talk through whether it fits your situation — the hardware, the model choices, or how to put an agent in front of it — I would welcome the conversation. You can reach me at john@common-sense.com or through common-sense.com/contact.